Translate Here / Terjemahkan

Friday, April 11, 2008

Paid to Click lewat Donkey Mails

lang : indonesia
Dari sekian banyak tawaran dari situs-situs MLM banyak kita temukan kata paid to click , paid to sign up , paid game dsb. artinya ketika kita mengklick ,sign up atau main game maka kita akan mendapatkan bagian ( uang ) walapun itu sedikit demi sedikit .namun banyak juga situs yang bertujuan untuk mencari keuntunan dengan cara menipu . Mereka membuat situs yang sama dengan yang aslinya tapi sebenarnya situs tersebut palsu , dengan cekatan mereka meniru mulai dari tampilan , isi , bahkan nama situs sehingga orang lain bisa tertipu dengan mendaftar dan mentransfer atau menyimpan uangnya di situs tersebut .
sebenarnya dari situs tersebut ada yang mengandung unsur judi ( gambling) misalnya lotere , head or tails game , jackpot dsb. namun banyak orang yang tidak peduli dengan itu walaupun mereka tahu tapi tidak mau tahu , ada juga orang yang tidak tahu-menahu atau tidak mengerti dengan sistem semacam ini .
Dengan banyaknya situs semacam itu saya menjadi penasaran dan mencoba sebuah situs yang menawarkan hal semacam itu seperti donkey mail . ternyata setelah saya mencoba fitur paid to click , paid to sign up saja saya bisa mendapatkan beberapa sen yang bisa saya kumpulkan dan saya cairkan lewat rekening egold. Sekarang saya percaya bahwa dari sekian banyak situs yang menawarkan hal semacam ada yang benar dan ada yang menipu ( scam ) .
tapi saya sarankan kalau ada yang ingin mencoba , jangan sekali -kali masuk situs yang mengandung unsur gambling ( judi) seperti lotere , atau game yang menawarkan keberuntungan semata tanpa ada suatu kerja keras yang lazim ( mengundi nasib ).
Ada juga yang menawarkan hasil yang lebih banyak seperti google adsense. Semua percaya bahwa mencari uang itu tidak mudah semudah apa yang banyak di tawarkan dengan hasil yang sangat menggiurkan . Disini kita dituntut untuk bekerja keras tapi tidak menggunakan otot fisik tapi otak . yang paling penting adalah strategi

Read More../ baca selanjutnya ...

Power Inverter

Add to Technorati Favorites

Converting 12 volts dc into a well-regulated 220 v ac at high efficiency is especially desirable when the input power source is derived from solar cells or a car battery. Often, too, output harmonics generated by the conventional square-wave inverter must be reduced to a point
where it does not create other practical drawbacks. These design requirements are met with this inverter, which maintains efficiency and reduces harmonics at all power levels by ensuring that the driving current is almost linearly proportional to the output power and by producing a three-level output waveform that more closely approximates a sine wave. As shown, the CD4013 dual flip-flop generates a l00-hertz pulse train (duty cycle is 1/6) and a 50-Hz square wave (the oscillator is easily modified for 60 Hz), both of which are independent of input voltage and load variations. The AND gates formed by the diode-resistor networks at the output of the flip-flops apply these signals to the power transistor drive circuitry (BC548, MJE801, etc.), which, configured in a two-phase switched-mode arrangement that sends a pulse through
the primary of the line transformer every quarter cycle at 50 Hz, generates a three-level waveform.

Because the positive and negative output swings each last one third of a cycle, separated by sixth-period intervals at the zero crossings, third-harmonic attenuation is theoretically reduced to zero. By appropriate modulation of these zero-voltage intervals, good regulation is achieved at low loss without reintroducing excessive third harmonic energy. Although this method is not as
elegant as the transformerless method of summing phase-shifted square waves or stepped sine waves,’ it is much simpler. D1 and C1 ensure reliable startup. Current limiting is provided by Q1, which diverts drive current if output current soars. Output impedance is kept virtually constant
during all parts of the cycle, including zero-voltage periods, where Q2 saturates Q3, thus feeding an inductive current back into the battery via diodes D2 and D3. The zener diode provides spike suppression. A neon lamp or similar symmetrical-breakdown device allows simple voltage regulation. When Vout, soars, Ci attains breakdown before the normal zero-voltage period, and Q4 or Q5 diverts current. Because this is a switched-mode inverter, efficiency is excellent at nominal output power. But, in contrast to other inverters, its high-efficiency characteristic extends down to very low output-power levels. This is achieved by forcing output current to flow not only through the transformer’s secondary, but also through the baseemitter
junctions of the 2N5685 power transistors. Thus, base drive closely tracks the output power requirements. As long as the transformer winding ratio is compatible
with the gain needed to saturate the power transistors, significant power can be saved at the lower power levels. Efficiency exceeds 88% at 120 volt-amperes, 75% at 175
VA, and 50% at 15 VA. No-load loss is only 12 watts. Still better performance can be obtained by adopting the power Darlington configuration, as shown at the upper left. Using the Darlington, the inverter’s efficiency will be 89% at 150 VA, 70% at 225 VA, and 50% at 15
VA. Lower transformer step-up ratios further improve performance, because the output transistors switch more totally into saturation. Thus, 12-v dc-to-110-v ac and 24-v-dc-to-220-v-ac designs are more efficient than this 12-v-dc-to-220-v-ac circuit.

see the circuit diagram here
Read More../ baca selanjutnya ...

Sunday, April 6, 2008

Changing MAC Address

This is depending on the type of Network Interface Card (NIC) you have. If you have a card that doesn’t support Clone MAC address, then you have to go to second method.

    1. Go to Start->Settings->Control Panel and double click on Network and Dial-up Connections.

    2. Right click on the NIC you want to change the MAC address and click on properties.

    3. Under “General” tab, click on the “Configure” button

    4. Click on “Advanced” tab

    5. Under “Property section”, you should see an item called “Network Address” or "Locally Administered Address", click on it.

    6. On the right side, under “Value”, type in the New MAC address you want to assign to your NIC. Usually this value is entered without the “-“ between the MAC address numbers.

    7. Goto command prompt and type in “ipconfig /all” or “net config rdr” to verify the changes. If the changes are not materialized, then use the second method.

    8. If successful, reboot your systems.

Method 2:

This method requires some knowledge on the Windows Registry. If you are not familiar with Windows Registry, just use the SMAC tool to change the MAC addresses, or consult with a technical person before you attempt on the following steps. Also, make sure you have a good backup of your registry.

a. Goto command prompt and type “ipconfig /all”, and

I. Record the Description for the NIC you want to change.

II. Record the Physical Address for the NIC you want to change. Physical Address is the MAC Address


figure 1.

b. Goto command prompt and type “net config rdr”, and you should see something like


figure 2.

c. Remember the number between the long number (GUID) inside the { }. For example, in the above “net config rdr” output, for MAC address “00C095ECB793,” you should remember {1C9324AD-ADB7-4920-B02D-AB281838637A}. You can copy and paste it to the Notepad, that’s probably the easiest way. (See figure 2.)

d. Go to Start -> Run, type “regedt32” to start registry editor. Do not use “Regedit.”

e. Do a BACKUP of your registry in case you screw up the following steps. To do this

I. Click on “HKEY_LOCAL_MACHINE on Local Machine” sub-window

II. Click on the root key “HKEY_LOCAL_MACHINE”.

III. Click on the drop-down menu “Registry -> Save Subtree As” and save the backup registry in to a file. Keep this file in a safe place.

f. Go to “HKEY_LOCAL_MACHINE\SYSTEM\CurrentControlSet\Control\Class\{4D36E972-E325-11CE-BFC1-08002BE10318}. Double click on it to expand the tree. The subkeys are 4-digit numbers, which represent particular network adapters. You should see it starts with 0000, then 0001, 0002, 0003 and so on. (See figure 3.)


Figure 3.

g. Go through each subkey that starts with 0000. Click on 0000, check DriverDescDriveDesc should match the Description you recorded from step (a.-I.). If you are not 100% sure about the DriverDesc, then you can verify by checking if the NetCfgInstanceID keyword value matches the GUID from step (c).
If there is no match, then move on to 0001, 0002, 0003, and so on, until you find the one you want. Usually 0000 contains the first NIC you installed on the computer.
In this demonstration, 0000 is the NIC I selected. (See figure 3.)
keyword on the right to see if that's the NIC you want to change the MAC address. The

h. Once you selected the subkey (i.e. 0000), check if there is a keyword "NetworkAddress" exist in the right side of the window. (See figure 3.)

I. If "NetworkAddress" keyword does not exist, then create this new keyword:

i. Click on the drop down menu “Edit -> Add Value”.

ii. In the Add Value window, enter the following value then click OK. (See figure 4.)
Value Name: = NetworkAddress
Data Type: = REG_SZ


Figure 4.

iii. String Editor window will pop up at this time (see figure 5.)

iv. Enter the new MAC address you want to modify. Then click OK.
(There should not be any "-" in this address. Your entry should only consist of 12 digits as seen in the figure 5.)

II. If "NetworkAddress" keyword exists, make sure it shows the keyword type is REG_SZ, and it should show as NetworkAddress:REG_SZ: . This keyword might not have a value at this time.

i. Double click on the keyword NetworkAddress and the String Editor window will pop up. (See Figure 5.)

ii. Enter the new MAC address you want to modify. Then click OK.
(There should not be any "-" in this address. Your entry should only consist of 12 digits as seen in the figure 5.)


Figure 5.

j. There are 2 ways to make the new MAC address active. Method I does not require a system reboot:

I. Goto Start->Setting->Control Panel, and double click on "Network Neighborhood".
WARNING: Make sure you understand that you WILL lose the network connection after completing step "ii." below, and
if you have a DHCP client, you will get a new IP address after completing step "iii."

i. Select the Network Adaptor you just changed the MAC address.

ii. Right click on the selected Network Adaptor and click "Disable."
Verify the status column for this adaptor changes to "Disabled"

iii. Right click on the selected Network Adaptor and click "Enable."
Verify the status column for this adaptor changes to "Enabled"

iv. If for any reason it cannot be disabled or re-enabled, you have to
reboot your system to make the changes effective.

II. Reboot your Windows system.

k. Once completing step j (if rebooting the system, wait until the reboot is completed), go to command prompt, type “ipconfig /all” to confirm the new MAC address.

Read More../ baca selanjutnya ...

The Danger of Space

Space is a dangerous place, not only because of meteors but also because of rays from the sun and other stars.The atmosphere acts as our protective blanket on earth.Lights get through , and this essential for plants to make the food which we eat .Heat,too,makes our environments tolerable and some ultraviolet rays penetrate the atmosphere .Cosmics rays of various kinds come through the air from outer space ,but enormouse quantities of radiation from the sun are screened off.Radiation is greatest known danger to explorers in space ,but their spacesuits or walls of their spacecraft do prevent a log of radiation damage.

We all receive radiation here on earth from the sun , from cosmic rays and from radioactive minerals .The trouble is that it is extreemly difficult to be sure about radiation damage a-person nay feel well,but the cells of his or sex organs may be damaged.and this will not discovered until the birth of (deformed) children or even grandchildren.There have been a lot
of miserable cases resulting from radiationor radioactive dust. Read More../ baca selanjutnya ...

Low Voltage Microcontroller


The AT89C2051 is a low-voltage, high-performance CMOS 8-bit microcomputer with
2K bytes of Flash programmable and erasable read-only memory (PEROM). The
device is manufactured using Atmel’s high-density nonvolatile memory technology
and is compatible with the industry-standard MCS-51 instruction set.

By combining a versatile 8-bit CPU with Flash on a monolithic chip, the Atmel AT89C2051 is a powerful
microcomputer which provides a highly-flexible and cost-effective solution to many
embedded control applications.

The AT89C2051 provides the following standard features: 2K bytes of Flash, 128
bytes of RAM, 15 I/O lines, two 16-bit timer/counters, a five vector two-level interrupt
architecture, a full duplex serial port, a precision analog comparator, on-chip oscillator
and clock circuitry.

In addition, the AT89C2051 is designed with static logic for operation
down to zero frequency and supports two software selectable power saving
modes. The Idle Mode stops the CPU while allowing the RAM, timer/counters, serial
port and interrupt system to continue functioning. The power-down mode saves the
RAM contents but freezes the oscillator disabling all other chip functions until the next
hardware reset.

Feature

• Compatible with MCS®-51Products
• 2K Bytes of Reprogrammable Flash Memory
– Endurance: 1,000 Write/Erase Cycles
• 2.7V to 6V Operating Range
• Fully Static Operation: 0 Hz to 24 MHz
• Two-level Program Memory Lock
• 128 x 8-bit Internal RAM
• 15 Programmable I/O Lines
• Two 16-bit Timer/Counters
• Six Interrupt Sources
• Programmable Serial UART Channel
• Direct LED Drive Outputs
• On-chip Analog Comparator
• Low-power Idle and Power-down Modes
• Green (Pb/Halide-free) Packaging Option Read More../ baca selanjutnya ...

The island of Lombok is located east of Bali. Tourism is not quite as developed yet as Bali and it is that reason which makes Lombok the perfect getaway. Escape to picturesque mountainside landscapes to white sand beaches of the Gili Islands. A place to relax and unwind from the daily life back home. Lombok also has the third largest volcano in all of Indonesia, Mount Rinjani, which extends 3726 meters high with a crater lake called Segara Anak. The main season here are wet season which starts from November to May and dry season start from May-October. The best time to come is in the month of May when the weather is just perfect with bright daylight and green scenery. People & Religion The local inhabitants of Lombok are called Sasaks. They speak Indonesian as well as their local Sasak language. The other main ethnicity’s include Balinese, Chinese, Arabian, and Javanese. Lombok has three main districts with three capital cities: Mataram in the west, Praya in central and Selong in east Lombok. The majority of commerce is in the capital city of Mataram in west Lombok. The majority of the population on Lombok are Muslims. Every Friday around 12.30 noon, Muslims go to the mosques just like Christians go to church on Sunday. Therefore, on that day most businesses and government offices are closed half day and then re-open again after praying (not including Senggigi). If you are planning on traveling around the island and visiting small villages it is more respectable to wear slacks or knee length shorts, a shirt with sleeves or a sarong. If you happened to be here during Ramadan, which is the Muslim month of fasting from sunrise to sunset, please do not to eat, drink or smoke out in the open public during this month long fast. Even though the people don’t seem bothered in the common tourist areas like, Senggigi and the Gili islands, it is better to respect the people and not eat or smoke openly. Wetu Telu Wetu telu is an unique religion that that blends Islam - Animism and is only found in north Lombok. It roots stem from the village of Bayan in the north. The people who practice this still consider themselves Muslims but they have their own rituals in addition to the normal Muslim ones. One such ceremony is Nyiu, that takes place 1000 days after someone dies. The relatives of the deceased offer material things like clothing, toothbrushes, food, dishes, mattresses, etc. so the deceased will be pleased in heaven. Money & Local Currencies When changing money there are many money changers in Lombok. The best rates are usually in Senggigi. Money changers prefer new, clean large bills and will accept smaller denominations at a lower rate. If you have traveler’s checks the rate will be less than bank notes. Be sure to count your money before you leave money changers. You can also check local banks but the rate is slightly lower than outside. Re-count the money in front of the money changer reception is a must, as usually there's a quick tricky way how they can steal your money. A suggestion when changing money. If you plan on making small purchases be sure to carry small denominations with you because many sellers do not have change. The Rupiah come in denominations of 100,000, 50,000, 10,000, 5,000, 1,000, and 500, 100 in coin. Vehicle Rentals: Dont miss Lombok's beautiful scenery. If you choose to rent a car or motorcycles and drive yourself, you must have an International Driving License. Renting a car is a good alternative to get around Lombok, either self driving or with driver so you can relax and enjoy the view. (Tip driver pocket money for meals if you stop for lunch or dinner). If you are pleased with service, tip ( Rp. 20,000 minimum). If you collide with anything, or it collides with you, you are responsible for all cost. Motorcycles are a convenient and inexpensive way to get around the Island, but Tourists are frequently injured in motorbike accident. If you rent a bike, drive slowly and very defensively. Helmets are required by law but those provided by rental agencies offer little protection. Business Hours Indonesian work in the morning to avoid the heat of the day. If you need to visit a government office, arrive between 08 AM and 11:30 AM. This also apply to banks and private businesses. Government offices close early on Fridays and Saturdays. Generally offices are open 07:30AM - 3 PM Monday - Thursday, 07:00AM - noon on Friday, banks are closed on Saturday and Sunday. Cell Phone Cellular phone in Indonesia is GSM. If you have brought your cellular hand phone, you can purchase prepaid calling cards to make outgoing calls at lower cost than calling on your home SIM. Shops which sell these cards are prolific. Major service providers are: Telkomsel, Satelindo and XL Ritel. Look for signs and banners with those markings. Health and Medical Info Most hotels have on call doctors. For what it is known by Australian as "Bali Belly", Iomotil and Imodium eliminate Symptoms, but not infections. A fever along with the symptoms requires doctor prescribed antibiotics. Drink as much as liquid as possible. For discomfort, diarrhea, and cramping, drink strong, hot tea; avoid fruits and spicy food. Drink only bottled water or boiled water (air putih). Peel the fruit before eating; avoid raw vegetables except at reputable restaurants. Ice in restaurants is safe. Protect yourself from the intense equatorial sun. Use sun block and hat. Sexually transmitted diseases are increasing in Indonesia. Local sex workers have multiple partners from all over the world. Act responsibly and use condoms, available over the counter at pharmacies. Read More../ baca selanjutnya ...
Setting POP gmail using Thunderbird

Installing thunderbird

1. double click thunderbird setup , Please download here
2. klick next
3. read license agreement , if you accept the terms of agreement you must select " I accept the terms in the licensee of agreement" and click next
4. In setup type . choose the type of setup you prefer " standard" then click next
5. weit until thunderbird has been installed on your computer then click finish


make new account

  1. Double click thunderbird in your desktop icon or start menu > all program>mozila thunderbird>mozila thunderbird
  2. On account wizard select " email account " and click next
  3. in your name box , type your name for example ," wandra" and your email address like " wandra@gmail.com " then click next
  4. enter the name of your incoming server " pop.gmail.com " and your outgoing server "smtp.gmail.com"
  5. Now enter your incoming and outgoing username ,for example " wandra@gmail.com "
  6. If your conection error please setting port of pop mail server default " 995 "
click tools> acount setting > on server setting > enter port of pop mail server , default " 995 "

Good Luck Enjoy it ...thanks
Add to Technorati Favorites Read More../ baca selanjutnya ...
SETTING UP KYOCERA 7135 MODEM

Add to Technorati FavoritesHow to Setting up the Kyocera 7135 modem for winXp/WinNT maybe setting dial up modem in each country or operator is different but I want to share how to setting dial up modem kyocera 7135 in Indonesia.
For information I use :
>Kyocera 7135
>Laptop Toshiba Satellite A60
>Fren Card >data cable ( cradle cable ) original kyocera 7135 and
driver kyocera 7135 http://www.kyocera-wireless.com/7135-smartphone/ downloads/7135_modem_drivers_win.zip

actually setting up dial up modem kyocera 7135 is same as most type of internal phone modem like GSM or CDMA . here are of most setting dial up modem kyocera 7135

1. install driver Klick Start >Control Panel> Phone and Modem Option> choose modems > Add modem in Add Hardware Wizard > install new modem >follow the instruction until finish

2. Setting Kyocera 7135 modem in Icon menu choose FaxModem > Incoming Calls > choose Data, next call . then Settings > and choose Speed: 230400 , Flags : 8-N-1, Flow Control : Software. then plug PDA into Cradle cable USB ,and connecting to laptop or PC via USB port

3. Setting PC/Laptop make new connection at start menu > all program > accessories> communication > new connection wizard and type name of your connection ( fren), username (m8) ,and password(m8) ,phone #777 and then click connect wait until connection : notes : if your connection error : try type command string at Start menu >Control Panel> Phone and Modem Option> Klick modems dan choose KYOCERA WIRELESS USB Modem then click properties , at the advance tab " Command String box" please type " at+crm=1 " or
" AT&F" or "AT&H E1".Klick OK

for user in indonesia
1. for fren user setting
username : m8
Pasword : m8 phone
num :#777 2.

for flexy
user username : telkomnet@flexy.com
Pasword : telkom phone
num :#777

Enjoy it.......Thanks
Read More../ baca selanjutnya ...
Enable POP Gmail

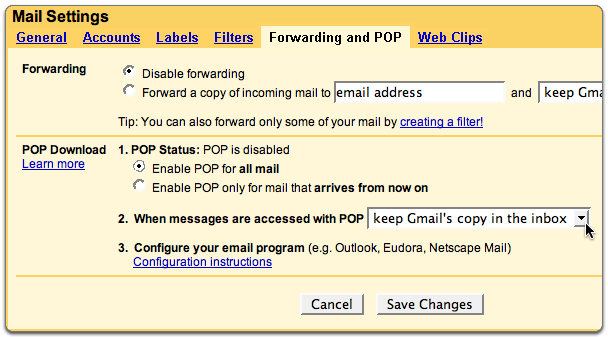
To enable POP in Gmail:

  1. Sign in to Gmail.
  2. Click Settings at the top of any Gmail page.
  3. Click Forwarding and POP/IMAP.

  4. Gmail POP Settings

  5. Select Enable POP for all mail or Enable POP for mail that arrives from now on.
  6. Choose the action you'd like your Gmail messages to take after they are accessed with POP.
  7. Configure your POP client* and click Save Changes.
Now you can configure pop client using microsoft outlook or thunderbird

microsoft outlook 2007

  1. Enable POP in Gmail. Don't forget to click Save Changes when you're done.
  2. Open Outlook.
  3. Click the Tools menu, and select Account Settings...
  4. On the E-mail tab, click New...
  5. If you are prompted to Choose E-mail Service, select Microsoft Exchange, POP3, IMAP, or HTTP, and click Next.
  6. Fill in all necessary fields to include the following information:
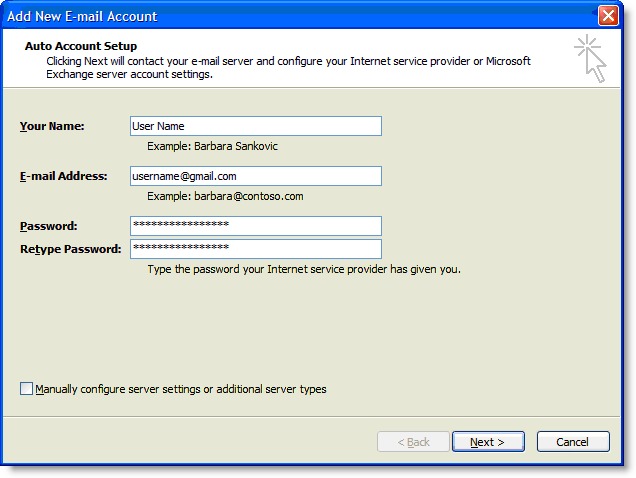
  7. Your Name: Enter your name as you would like it to appear in the From: field of outgoing messages.
    Email Address: Enter your full Gmail email address (username@gmail.com).
    Password: Enter your Gmail password.

    Manually configure server settings or additional server types: Leave this option unchecked if you want to automatically configure Outlook 2007. If you want to manually configure Outlook 2007, check this box now.

    Enter name, email address, and password
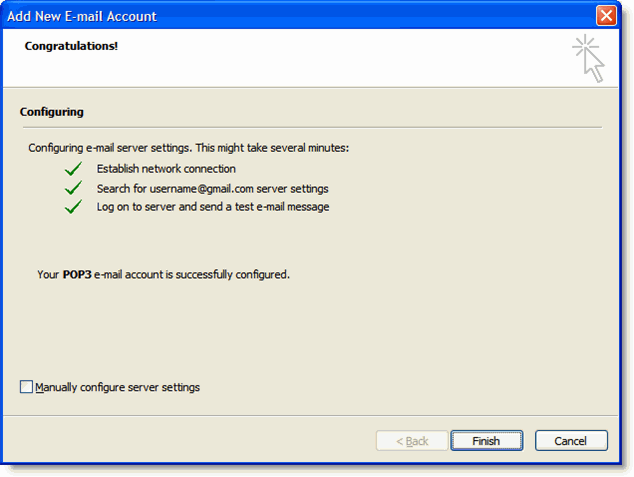
  8. Click Next. If you are configuring Outlook 2007 automatically, you're done! Just click Finish.
  9. Successful Configuration
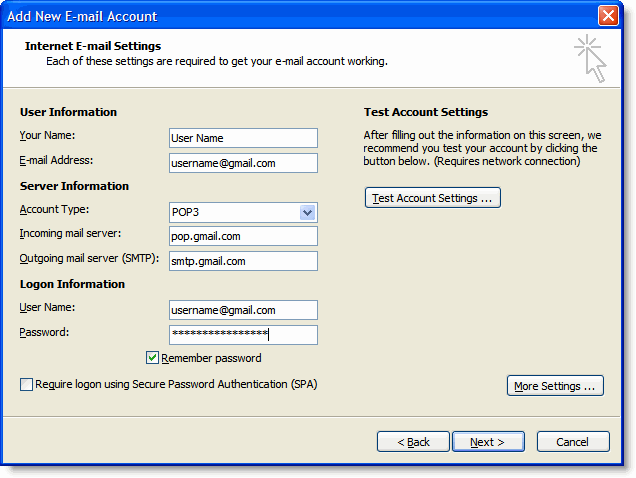
  10. If you are configuring Outlook 2007 manually, select Internet E-mail and click Next.
  11. Verify your User Information, and enter the following additional information:
  12. Server Information

    Account Type: POP3

    Incoming mail server: pop.gmail.com

    Outgoing mail server (SMTP): smtp.gmail.com

    Logon Information

    User Name: Enter your Gmail username (including @gmail.com).

    Password: Enter your Gmail password.

    Require logon using Secure Password Authentication (SPA): Leave this option unchecked.

    Account Settings
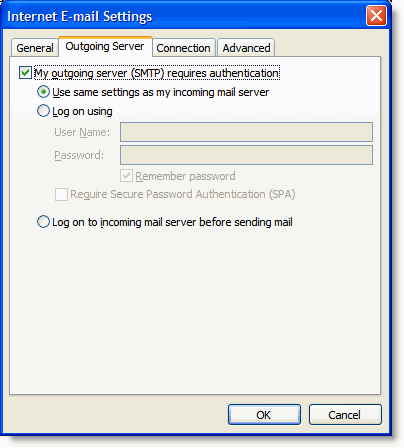
  13. Click the More Settings... button, and select the Outgoing Server tab.
  14. Check the box next to My outgoing server (SMTP) requires authentication and select Use same settings as my incoming mail server.
  15. Outgoing Server Tab
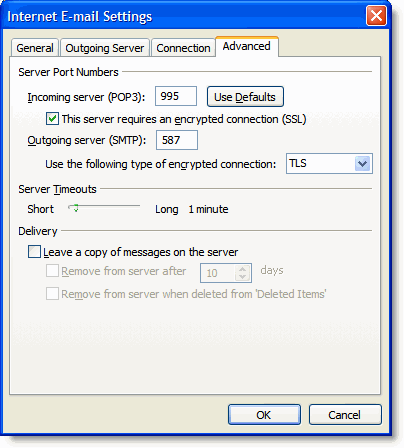
  16. Click the Advanced tab, and check the box next to This server requires an encrypted connection (SSL) under Incoming Server (POP3).
  17. Check the box next to This server requires an encrypted connection (SSL) under Outgoing Server (SMTP), and enter 465 in the Outgoing server (SMTP) box.
  18. Advanced Tab
  19. Click OK.
  20. Click Test Account Settings... After receiving Congratulations! All tests completed successfully, click Close.
  21. Click Next, and then click Finish.
Read More../ baca selanjutnya ...